
Redis Knowledge Notes
Redis-related notes previously written in Apple Notes
Redis is an open-source (BSD licensed), in-memory database (with very fast read/write speed), commonly used in scenarios such as caching, message queues, and distributed locks.
In addition, Redis also supports transactions, persistence, Lua scripts, clustering, publish/subscribe mode, memory eviction policies, and expiration deletion mechanisms.
What are the differences between Redis and Memcached?
Commonalities:
- Both are in-memory databases that can be used as caches.
- Both have expiration policies.
- Both have high performance.
Differences: - Memcached only supports key-value types.
- Memcached has no persistence mechanism.
- Memcached has no native clustering mode.
- Memcached does not support subscription models, Lua scripts, transactions, etc.
Why use Redis as a cache for MySQL?
Because Redis has the characteristics of “high performance” + “high concurrency”.
MySQL reads from the disk, while Redis reads from memory. Using Redis as a cache can significantly improve performance.
Redis’s QPS is much higher than MySQL’s, so acting as a cache can handle most requests directly, resolving them at the Redis level without needing to go through MySQL.
Redis Data Structures#
Operations on Redis data structures are atomic and handled by a single thread, so there is no concurrency competition issue.
Redis data structures include:
- String: Caching objects, regular counting, distributed locks, sharing session information.
- Hash: Caching objects, shopping carts.
- List: Message queues (but with issues that need resolution).
- Set: Aggregation scenarios: e.g., likes, mutual followers, lucky draws.
- Zset: Sorting scenarios: e.g., leaderboards, phonebook, name sorting.
- Bitmaps: Binary state statistics scenarios: e.g., check-ins, login status judgment, consecutive check-in user counts.
- HyperLogLog: Massive data statistics scenarios: e.g., UV counting for millions of web pages.
- GEO: Storing geographic location information scenarios.
- Stream: Message queues (solves problems compared to List).
String#
Mainly implemented by SDS (Simple Dynamic String). Compared to C strings:
- SDS can store text data and binary data.
- Getting the string length with SDS is O(1) (recorded by the len field).
- SDS APIs are safe; string concatenation will not cause buffer overflow (SDS checks if space meets requirements before concatenation and expands if necessary).
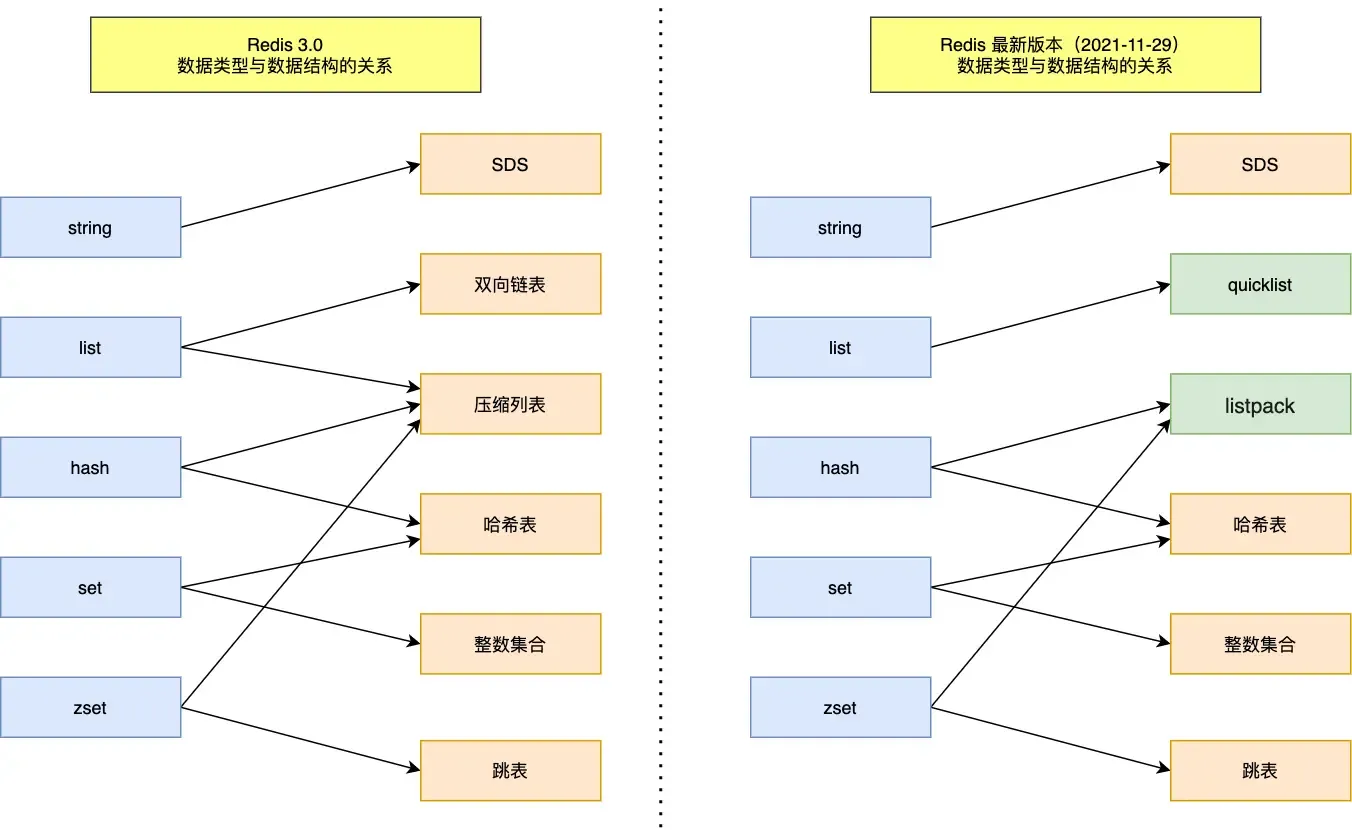
List#
Implemented by a doubly linked list or a compressed list.
- If the number of elements is less than 512 and each element is less than 64 bytes, a compressed list is used.
- Otherwise, a doubly linked list is used.
After Redis 3.2, the List底层 is only implemented by quicklist.
Hash#
Implemented by a compressed list or a hash table.
- If the number of elements is less than 512 and each element is less than 64 bytes, a compressed list is used.
- Otherwise, a hash table is used.
In Redis 7.0, the compressed list was deprecated and replaced with listpack.
Set#
Implemented by a hash table or an integer set.
- If the number of elements is less than 512, an integer set is used.
- Otherwise, a hash table is used.
Zset#
Implemented by a compressed list or a skip list.
- If the number of elements is less than 128 and each element is less than 64 bytes, a compressed list is used.
- Otherwise, a skip list is used.
In Redis 7.0, the compressed list was deprecated and replaced with listpack.
Redis Threading Model#
Is Redis single-threaded?
Redis’s single-threaded nature refers to the process from receiving a request to sending data to the client being handled by one thread.
However, Redis is not entirely single-threaded. Redis starts background threads (BIO) upon startup.
- Redis 2.6 starts 2 background threads: handling file closing and AOF flushing to disk.
- After Redis 4.0, a new background thread was added: for asynchronously freeing Redis memory (i.e., the lazyfree thread).
Redis creates separate threads for these tasks because they are time-consuming and could easily cause blocking if handled by the main thread.
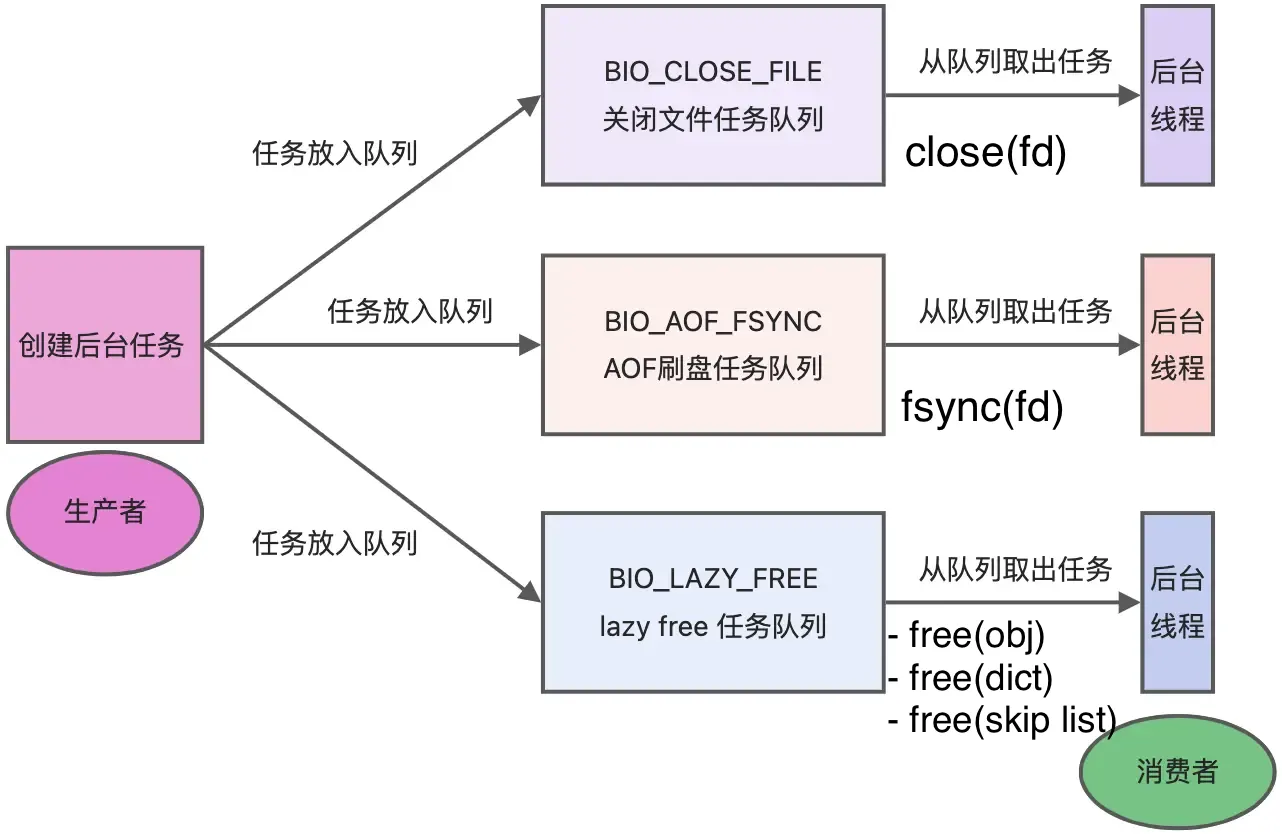
As shown, when there are tasks in the corresponding task queue, the background thread calls the appropriate method to process them.
Single-threaded model before Redis 6.0#
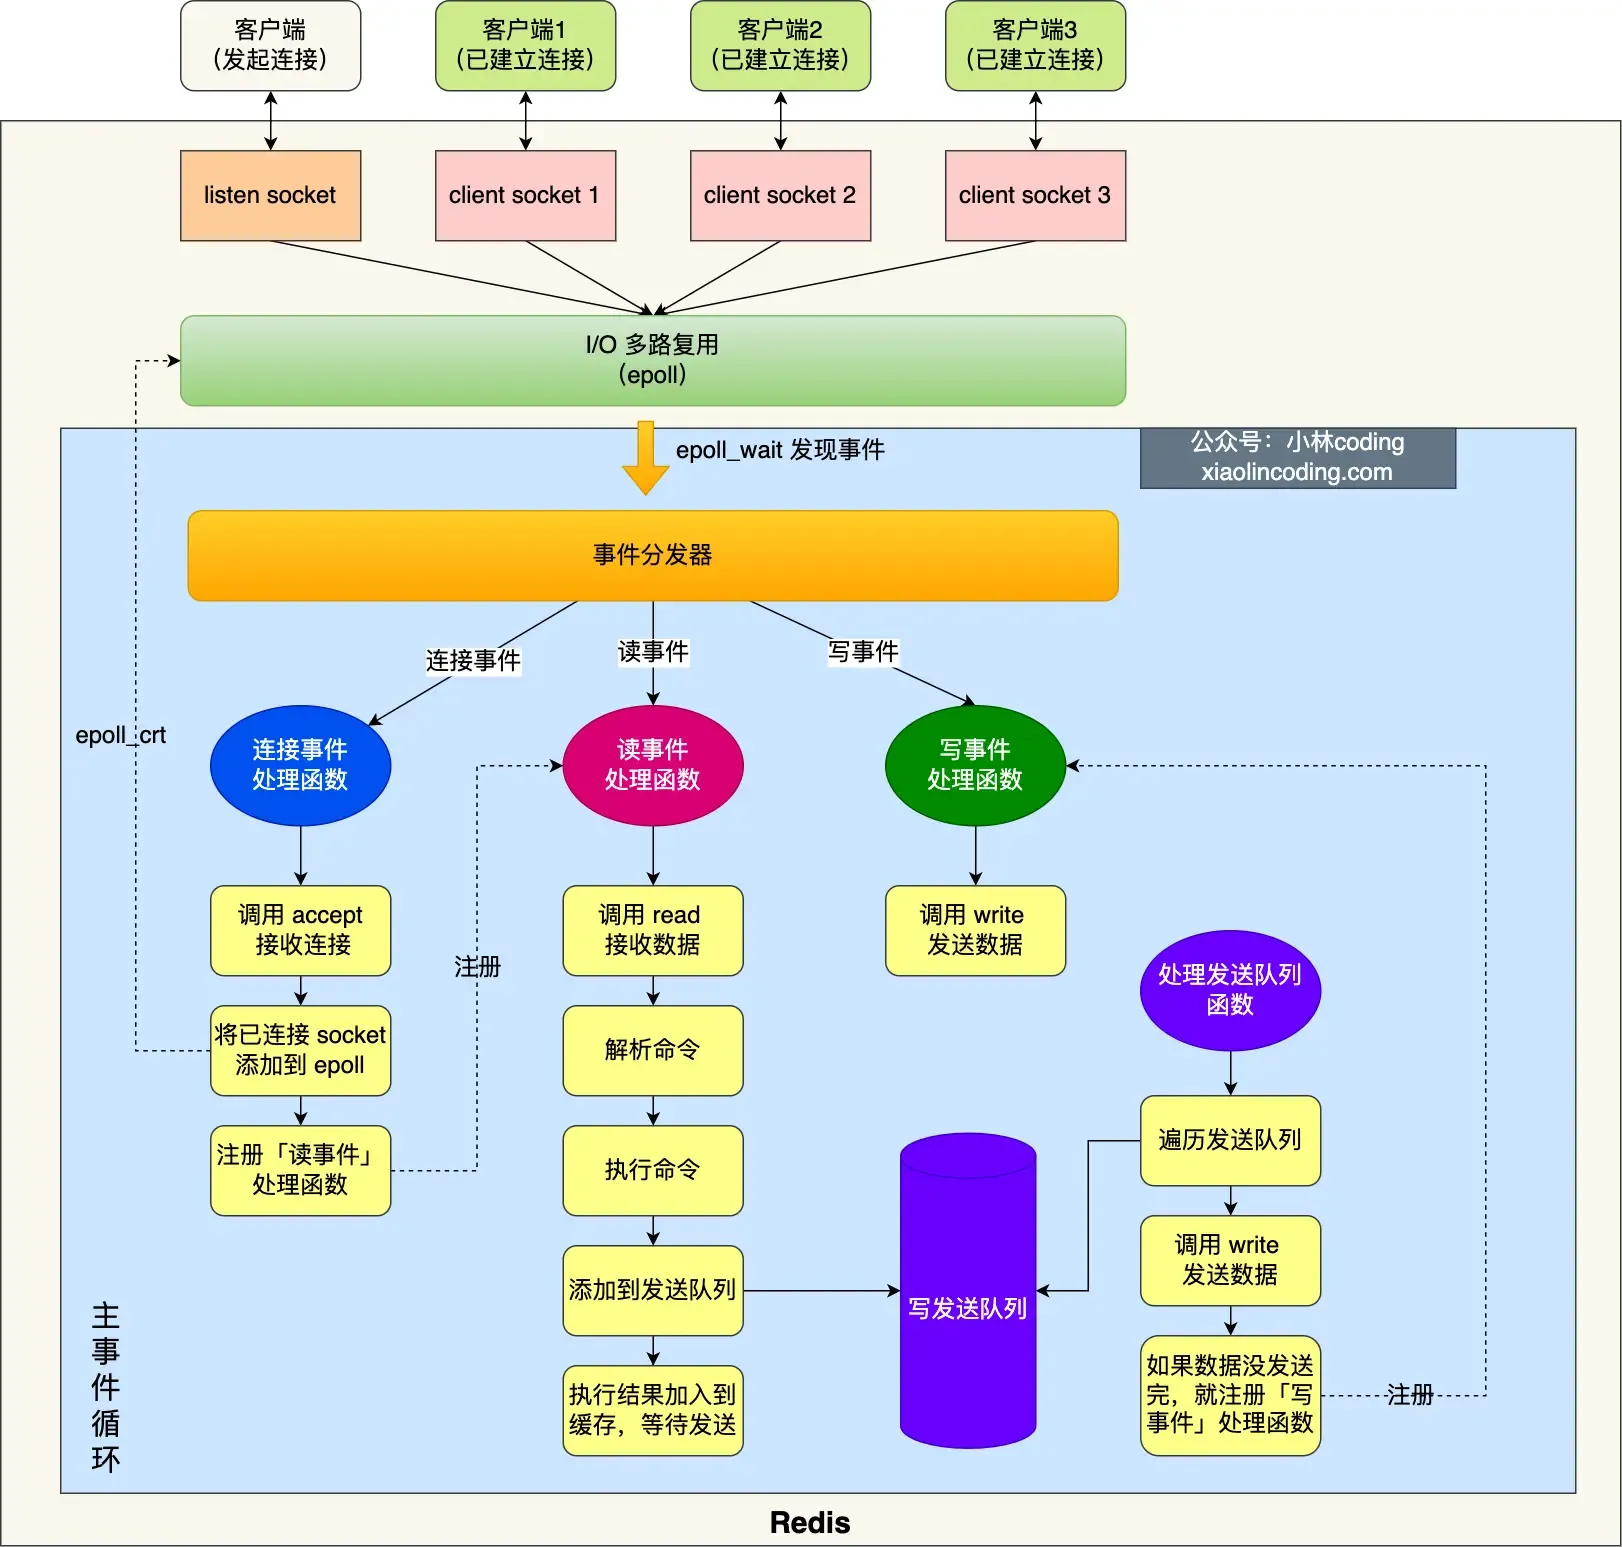
Initialization:#
- Call
epoll_create()to create an epoll object andsocket()to create a server socket. - Call
bind()to bind the port andlisten()to listen on that socket. - Call
epoll_ctl()to add the listening socket to the epoll instance, registering the handler for connection events.
Enter the event loop function:
- First, check if there are tasks in the “send queue” processing function; if yes, use
writeto send data. If not all data is sent in this round, register the write event handler to wait forepoll_waitto handle it later. - Call
epoll_waitto wait for events:- Connection events
- Read events
- Write events
Why is Redis so fast even though it’s single-threaded?#
This also explains why Redis used a single thread before version 6.0.
Single-threaded Redis can achieve a throughput of 100k requests/second.
- Most Redis operations are performed in memory with efficient data structures (the bottleneck is memory/network bandwidth, not CPU).
- Redis’s single-threaded nature avoids competition between multiple threads, eliminating the performance overhead (and problems) caused by multithreading.
- Redis uses an I/O multiplexing mechanism (one thread handling multiple I/O streams), i.e., the
select/epollmechanism.- With Redis’s single-threaded model, multiplexing allows it to have multiple listening sockets and already connected sockets. The kernel continuously monitors these requests (once a request arrives, it’s handed over to the Redis thread for processing).
Why was multithreading introduced after Redis 6.0?#
Here, “multithreading” refers to using multiple I/O threads to handle network requests (Redis’s performance bottleneck might occur during network I/O processing).
Multithreading is used for network I/O, but command execution still uses a single thread!
After Redis 6.0, by default, Redis creates 6 additional threads on startup:
- Redis-server: The main thread, executes commands.
bio_close_file,bio_aof_fsync,bio_lazy_free: Background threads, as detailed above.io_thd_1/2/3: 3 I/O threads. Withio-threadsdefaulting to 4, 3 I/O threads are started to share the network I/O pressure on Redis.
Redis Persistence#
This involves storing data on disk (to avoid data loss after Redis restarts), allowing Redis to recover original data from disk after a restart.
Three persistence methods:
- AOF log
- RDB snapshot
- Mixed persistence: Combines the advantages of AOF and RDB (Redis 4.0).
AOF Log#
After Redis executes a write command, it appends the command to a log file.
But why write to the log file after executing the command, not before?
- Avoids extra check overhead: If the current command has a syntax error, not checking it beforehand could cause errors during log recovery.
- Doesn’t block the current command’s execution.
However, this can lead to data loss (if the machine crashes before writing to the log) and the risk of blocking other operations (writing the log to disk can block subsequent operations).
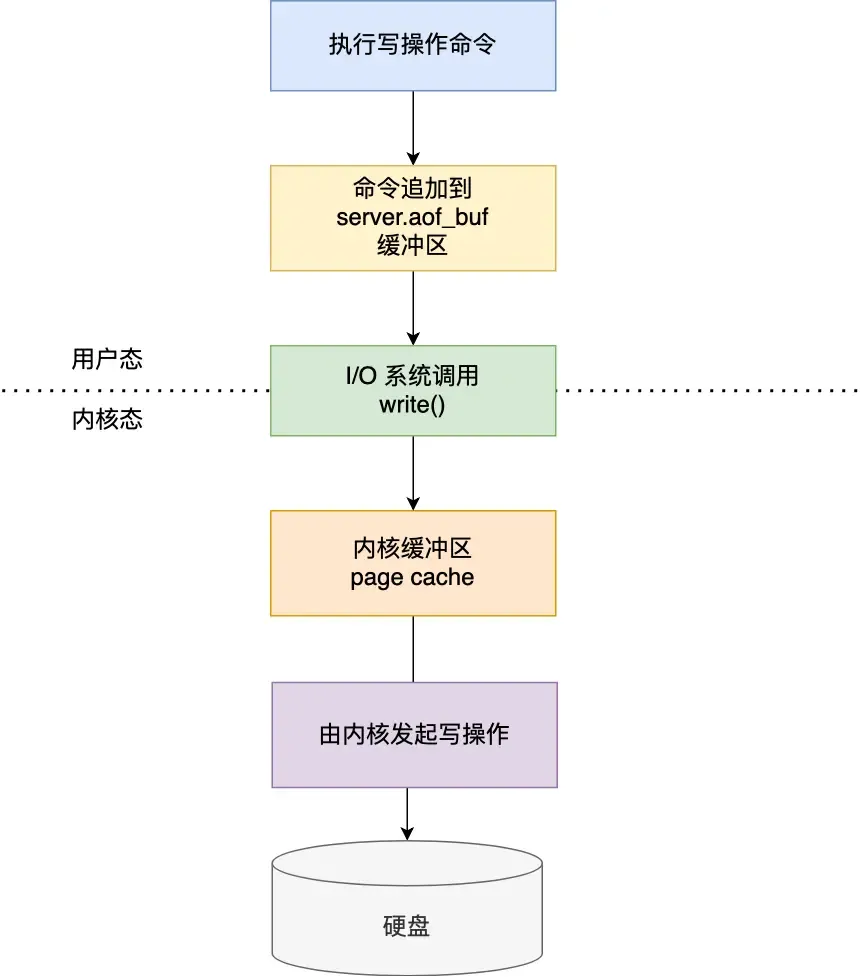
AOF write-back strategies:
- Always: Synchronously write the log data back to disk after each write command (high performance overhead but reliable).
- Everysec: After each write command, write the command to the Page Cache first, then write the buffer content to disk every second (loses 1 second of data on crash, moderate performance).
- No: Similarly, write to the kernel buffer after each operation, but let the OS decide when to flush the buffer to disk (more data loss possible on crash, but good performance).
If the AOF log becomes too large, what are the impacts, and how to solve it?
When the log is too large, the data recovery process after restarting Redis becomes slow (causing performance issues).
To solve this, Redis provides the AOF rewriting mechanism (compresses the AOF file), triggered when the AOF file exceeds a set threshold.
How is it compressed?
If the same commands were executed multiple times, only the latest value matters; previous commands don’t need to be recorded. (The new AOF file overwrites the old one, achieving compression.)
How is it accomplished?
Using a background child process bgrewriteaof:
- The main process can continue processing requests, avoiding blocking the main thread.
- If threads were used, they share memory, requiring locks for safety when modifying shared memory, which reduces performance. Using a child process shares memory data read-only. When one side modifies shared content, Copy-on-Write occurs, giving parent and child independent data copies.
But according to the above point: “Modifying shared memory triggers Copy-on-Write,” then at this time, memory data inconsistency can also occur. How to solve it?
Redis sets up an AOF rewrite buffer (used after thebgrewriteaofchild process is created).
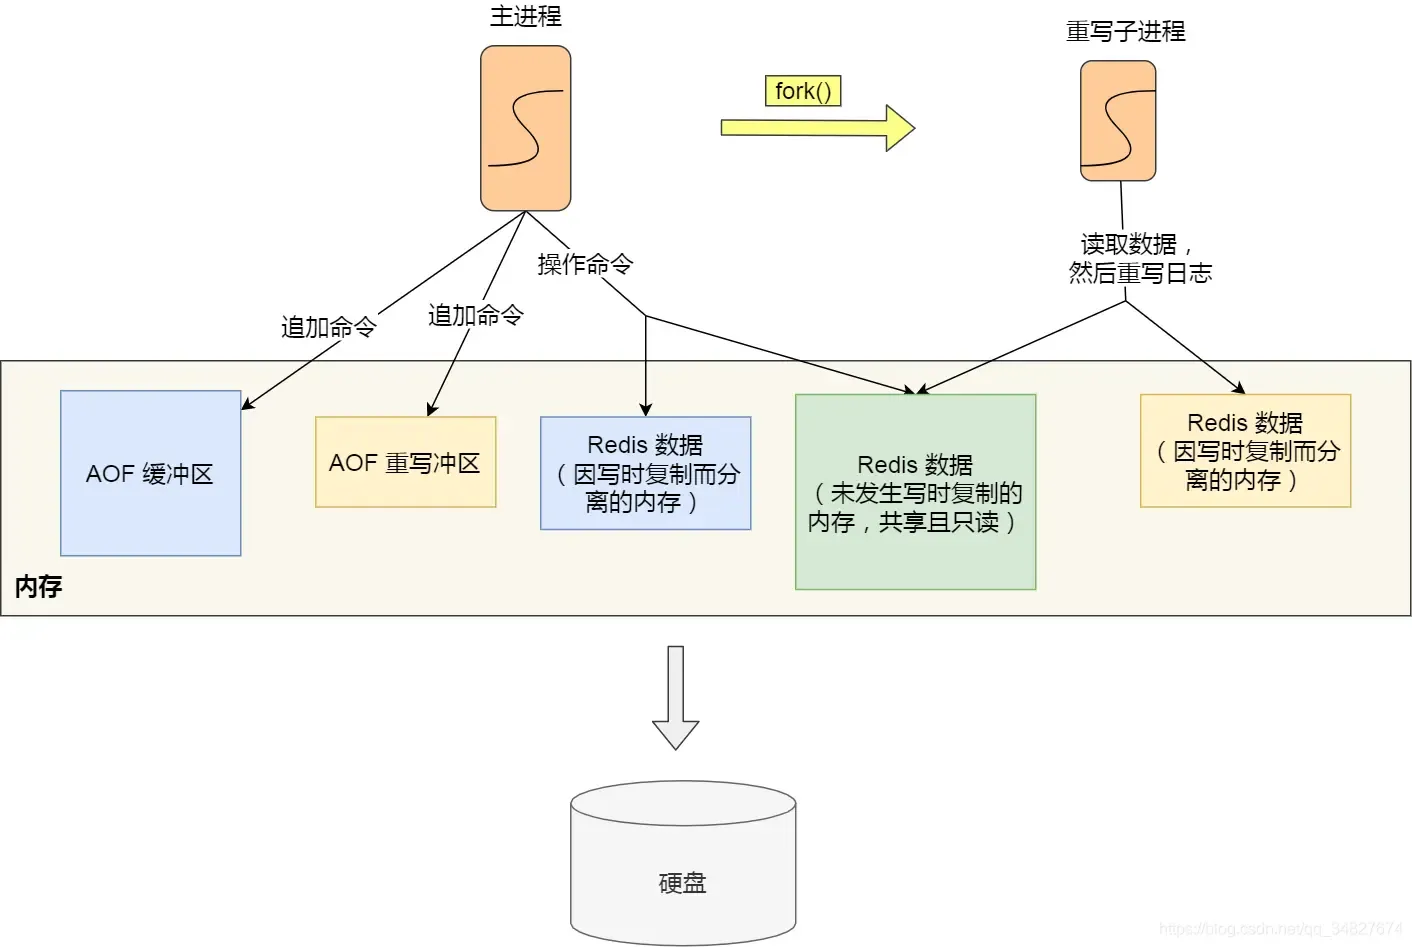
During the AOF rewrite by the child process, the main process does: - Executes commands from clients.
- Appends the executed write commands to the “AOF buffer”.
- Appends them to the “AOF rewrite buffer”.
When the child process finishes the AOF rewrite, it sends an asynchronous signal to the main process.
The main process, upon receiving the signal, calls the signal handler:
- Appends all content from the AOF rewrite buffer to the new AOF file, ensuring the database state matches between old and new files.
- Renames the new AOF file, overwriting the existing AOF file.
After this, the main thread continues processing commands.
Simply put:
To solve the inconsistency problem during Copy-on-Write, the method here is: the main thread first writes commands to the buffer. After the child process completes the rewrite, the main process appends the buffer content to the new AOF file and then overwrites the existing AOF file (solving it by direct appending + overwriting).
RDB Snapshot#
Data recovery is done via snapshots (snapshots record actual data, so recovery is more efficient than AOF, no need to execute additional commands), just load the RDB file into memory.
Two commands to generate RDB files:
save: Generates the RDB file in the main thread. If writing the RDB file takes too long, it blocks the main thread.bgsave: Creates a child process to generate the RDB file, avoiding blocking the main thread.
Configure via config file:
# Meaning: within <second1> seconds, at least <times1> modifications were made to the database
save <second1> <times1>
save <second2> <times2>
...
Any trigger condition being met will create a child process to generate an RDB snapshot (bgsave).
The snapshots generated by Redis are full snapshots, recording all data in memory to disk. This is a relatively heavy operation. Doing it too frequently impacts Redis performance; doing it too infrequently can lead to excessive data loss on crash.
Can data be modified while an RDB snapshot is being taken?
Yes, data can be modified during bgsave thanks to the “Copy-on-Write (COW) technology.”
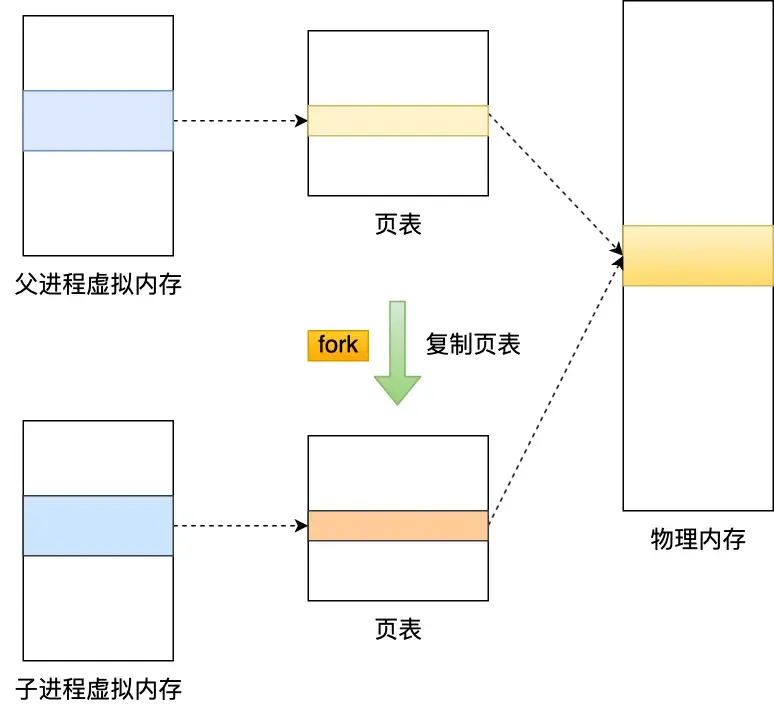
During read operations, the main thread and the bgsave child process don’t affect each other.
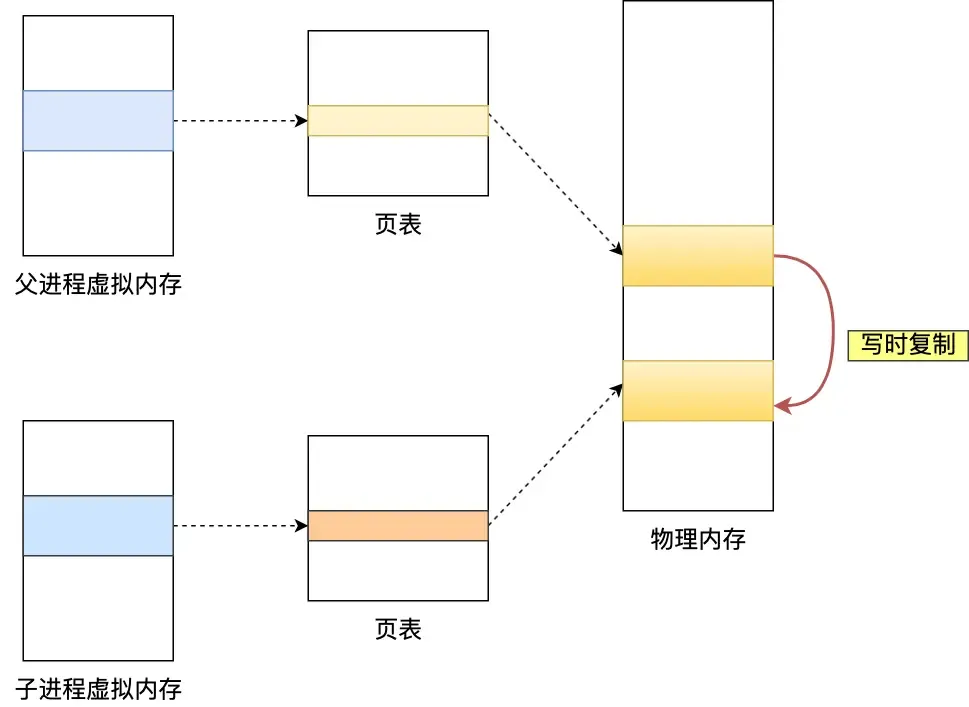
If the main thread performs a write operation, the data being modified is copied (a replica), and then bgsave writes the replica data to the RDB file. The main thread can still directly modify the original data.
Q: Didn’t quite understand this part…
Mixed Persistence#
For AOF: Less data loss, but slow recovery.
For RDB: Fast recovery, but snapshot frequency is hard to balance (too frequent affects performance, too infrequent loses more data).
Redis 4.0 introduced mixed persistence (mixing AOF log and memory snapshot), ensuring both fast restart speed and reduced risk of data loss.
With mixed persistence enabled, the AOF file’s first half contains full data in RDB format, and the second half contains incremental data in AOF format.
(Thus, on restart, the beginning is in RDB format for fast loading, then AOF content is loaded, i.e., the operation commands processed by the main thread while the background child process was rewriting the AOF, resulting in less data loss.)
Advantages: Combines the strengths of both. The RDB format at the start enables faster Redis startup, combined with AOF’s advantages, reduces the risk of data loss.
Disadvantages: The AOF file’s readability becomes poor, and compatibility is reduced; if enabled, it cannot be used with versions prior to Redis 4.0.
Redis Cluster#
How does Redis achieve service “high availability”?#
Consider from the perspective of multiple Redis service nodes:
- Master-Replica Replication
- Sentinel Mode
- Sharded Cluster
Master-Replica Replication:
This involves synchronizing data from one Redis server to multiple others (one master, multiple replicas mode), using a “read-write separation” approach.
Replica servers are generally read-only. They receive write commands synchronized from the master server and execute them (i.e., data modifications happen on the master and are synchronized to replicas).
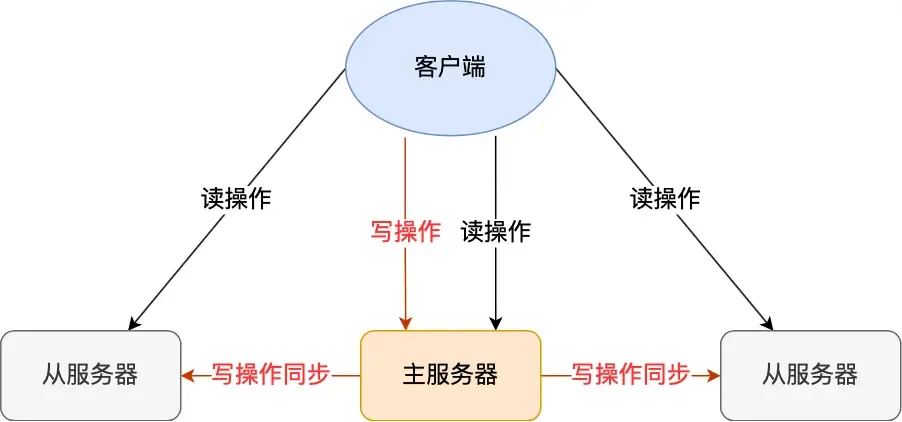
This uses an asynchronous method (the master returns results to the client immediately after executing the command), so strong data consistency cannot be achieved.
First Synchronization
Use the command replicaof (before Redis 5.0, it was slaveof) to establish the master-replica relationship, e.g.:
replicaof <ip_a> <port_a> // executed by b
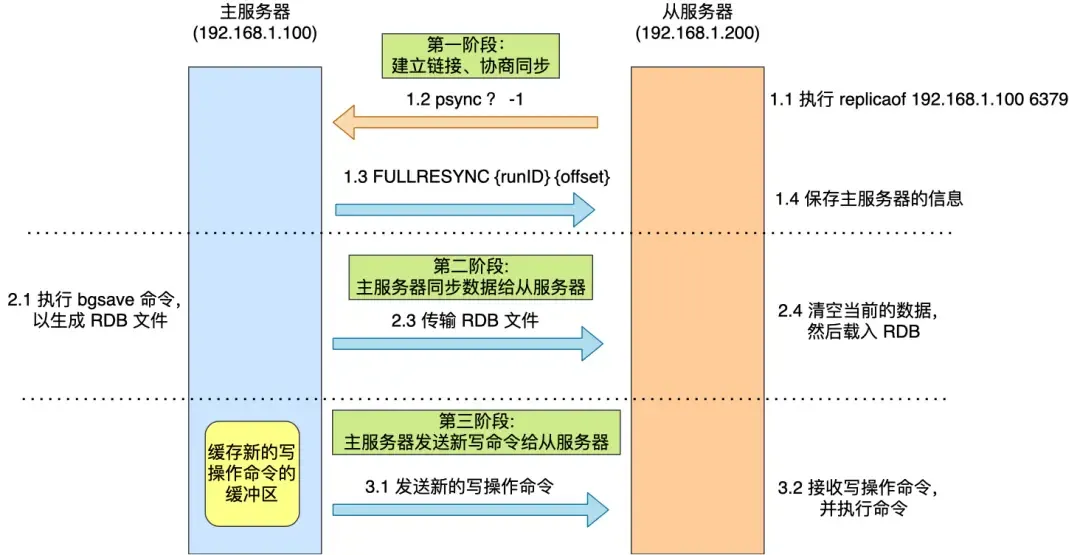
This makes b a replica of a, and then the first synchronization begins, comprising three phases:
- Establish connection, negotiate synchronization
- The replica server executes the replica of command.
- Sends the
psynccommand to the master server, containing two parameters:runID: A random ID uniquely identifying itself (default ”?”).offset: The replication progress (default -1).- This
offsetrefers toslave_repl_offset.
- This
- The master server receives
psyncand responds withFULLRESYNC(full replication).
- Master server synchronizes data to the replica server
- The master executes
bgsaveto generate an RDB file. - The replica receives the RDB file, clears its current data, and loads the RDB file (however, during this time, the master can still receive commands, leading to data inconsistency, so:)
- Write commands received during the following intervals are written to the
replication buffer:- While the master is generating the RDB file.
- While the master is sending the RDB file.
- While the replica is loading the RDB file.
- The master executes
- Master server sends new write commands to the replica server
- Sends the write commands recorded in the
replication bufferto the replica, which executes them, thus achieving data consistency.
- Sends the write commands recorded in the
Command Propagation
After the first synchronization, both sides maintain a TCP connection (long connection). Subsequently, the master can continue propagating write operations to the replica through this connection, and the replica executes the commands to maintain data consistency.
Sharing the Server Load
From the above, generating and transmitting the RDB file during data synchronization is time-consuming. If there are many replicas, the master’s synchronization overhead becomes very high (busy forking child processes, which blocks the main thread, preventing Redis from handling requests normally).
Therefore, a replica server in Redis can also act as a “manager” and have its own replicas. This replica can receive synchronized data from the master and also act as a master to synchronize data to its own replicas:
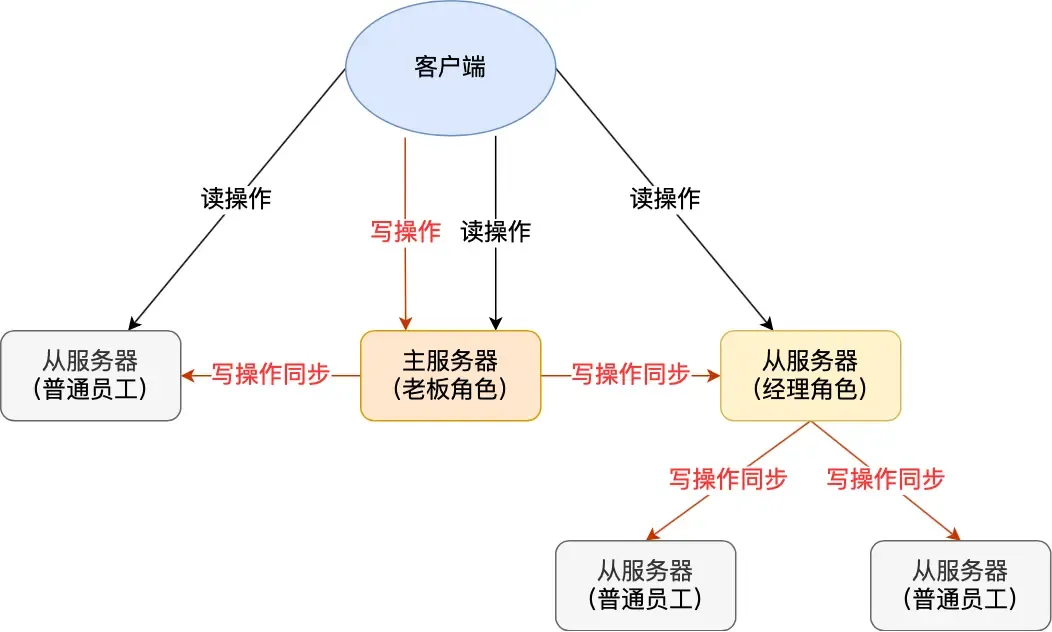
This helps share the pressure (of generating/transmitting RDB files) on the master server.
Simply use replicaof <tar_ip> 6379 to make a server a replica of the target server. If the target server is itself a replica, it acts as the “manager” role.
Incremental Replication
After the master and replica complete the first synchronization, they propagate commands over the long connection. If the network between them disconnects, command propagation stops, leading to data inconsistency. Clients reading from the “replica” might get old data.
If the network later recovers, how should data synchronization proceed?
Before Redis 2.8, it would perform a full replication, which has high overhead. This can be improved.
Starting from Redis 2.8, incremental replication is used to continue synchronization (only synchronizing the write commands received during the disconnection period).
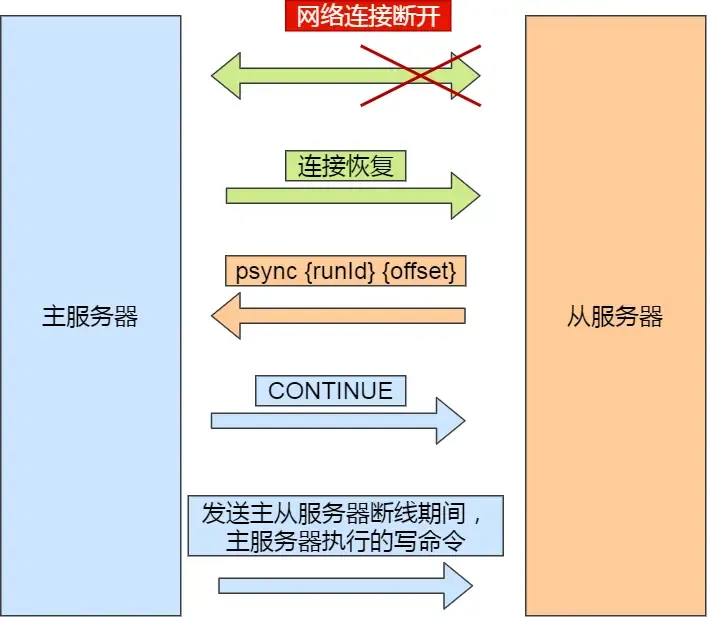
Incremental replication after network recovery:
- After the replica recovers the network, it sends
psync {runID}{offset}to the master. - The master receives the command and responds with
CONTINUE, telling the replica to use incremental replication. - The master sends the write commands executed during the disconnection to the replica, which then executes them.
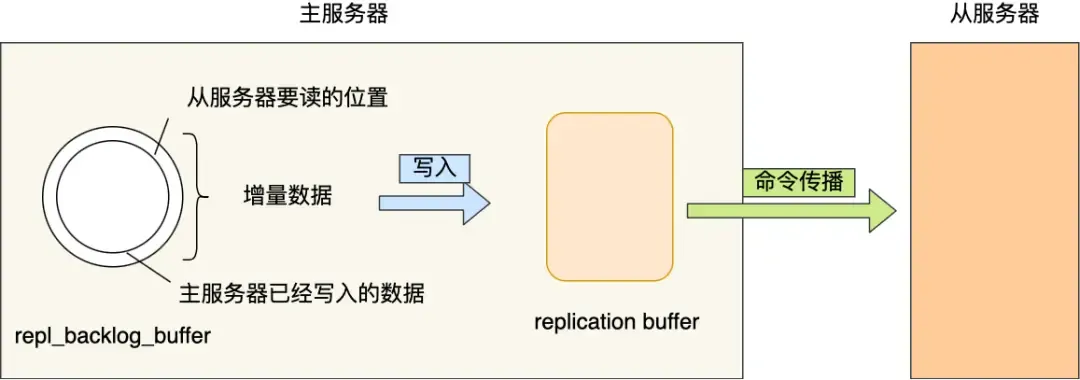
How does the master know which incremental data to send to the replica?
repl_backlog_buffer: A circular buffer (default 1MB) used to find the differential data after a master-replica disconnection.Replication offset: Marks the synchronization progress on the above buffer. The master and replica record their own “written/read” positions viamaster_repl_offsetandslave_repl_offset.
When is repl_backlog_buffer written?
During command propagation, the master sends write commands to both the replica and the repl_backlog_buffer. So this buffer stores recently propagated write commands.
When the network disconnects and reconnects, the replica sends its slave_repl_offset to the master via psync. The master decides which operation to use based on the gap between the slave’s offset and the master’s buffer content:
- If the data the replica needs to read is still in the
repl_backlog_buffer, the master uses incremental replication. - Otherwise, it uses full replication.
Since repl_backlog_buffer is a circular buffer with a limited size (default 1MB), once it fills up, the master’s continued writing will overwrite old data. If the master’s write speed significantly exceeds the replica’s read speed, the buffer can be overwritten quickly, causing the replica to miss the data it needs to read, leading to full synchronization with high performance overhead.
Therefore, to prevent the master from frequently resorting to full synchronization, the circular buffer size can be adjusted to be as large as possible, reducing the probability of overwrites. The minimum buffer size can be estimated based on second * write_size_per_second (to be safe, it’s better to increase it further):
secondis the average time for a replica to reconnect to the master after disconnection.write_size_per_secondis the average size of write commands generated by the master per second.
For Master-Replica Replication:
- [Full Replication] Used during the first synchronization (but generating/transmitting RDB is time-consuming; if there are many replicas, consider promoting some to “managers” to share the master’s load).
- [Command Propagation] Master and replica maintain a long connection. After receiving write commands, the master propagates them through this connection to maintain data consistency.
- [Incremental Replication] Used if the network disconnects, related to the
repl_backlog_size(as above).
Q: What exactly do
replication buffer,master/slave_repl_offset, andrepl_backlog_bufferrepresent? What is the relationship between these buffers/offsets and theoffsetparameter inpsync?A: This is indeed easy to confuse:
For
replication buffer:
Its lifecycle is tied to the connection between the master and a specific replica. If the connection is disconnected, this buffer is deleted (overflowing the
replication buffercan cause disconnection).It exists on the replica side? Wait, check this. Actually, the replication buffer is maintained by the master per replica. It’s used for sending write commands during the RDB generation/sending/loading phase.
For
repl_backlog_buffer:
A circular buffer, shared globally! Composed of a char array with several internal variables:
size(total buffer size),buffer(write offsetmaster_repl_offset?),hislen(length of valid data).Write commands during a network disconnection period are written to this buffer (not the
replication buffer).For
master_repl_offset/slave_repl_offset:
master_repl_offsetis the master’s current write position.slave_repl_offsetis the last position acknowledged by the replica.They are 64-bit integers.
A common misconception is about the structure of the circular buffer:
1. The circular buffer has a single global `idx` pointer, current write position, etc. `slave_repl_offset` is specific to each replica.
2. Acknowledgment variable from the replica: `repl_ack_off`: The progress of the replica as recorded by the master (stored in the master's client object for that replica). This is the position acknowledged by the replica.
   `slave_repl_offset` is the "logical offset" on the **replica node itself**, i.e., the position up to which the replica has executed commands.
3. Both `master_repl_offset` and `repl_backlog_idx` are write positions. What's the difference? The former is a logical offset, the latter is a physical address within the buffer.
> I feel a detailed 'mermaid' diagram is needed for this complex process.
How to determine if a node is working properly?
By pinging each other. If more than half of the nodes ping a node and get no response, it is considered down, and connections to it will be disconnected.
- Master nodes default to sending
pingcommands every 10 seconds (controlled byrepl-ping-slave-period) to check node liveness and connectivity. - Replica nodes default to sending
replconf ack {offset}commands every 1 second to the master, reporting their own replication offset.- Real-time detection of replica status.
- Report offset to check for data loss. If a replica has lost data, it pulls the missing data from the master’s replication buffer.
Sentinel Mode:
The Sentinel mechanism, supported after Redis 2.8, implements failover for master-replica nodes. It monitors whether the master node is alive. If it finds the master is down, it elects a replica node as the new master and notifies replicas and clients of the new master’s information.
Judging whether the master node is faulty:
Subjective Down: A Sentinel sends ping commands to all master and replica nodes every second. Upon receiving a ping, master/replica nodes send a response to the Sentinel to determine if they are running normally. If a master or replica node does not respond within the specified time (down-after-milliseconds), it is marked as “subjective down.”
Objective Down: After a Sentinel judges a master node as subjectively down, it issues a command to other Sentinels. Other Sentinels vote in favor/against based on their own network conditions with the master. If the number of affirmative votes reaches the quorum value (more than half), the master node is marked as “objective down.”
This applies only to the master node (as the master might time out due to system pressure/network congestion). To reduce misjudgment, multiple nodes are deployed as a Sentinel cluster, making judgments together to avoid misjudgment caused by poor network on a single node.
Which Sentinel performs the master-replica failover?
A leader needs to be elected within the Sentinel cluster to execute the master-slave switch. This requires voting.
The Sentinel node that judged the master as “objective down” becomes a candidate. This candidate sends is-master-down-by-addr commands to get affirmative votes to reach the quorum value. Of course, there might be multiple such candidates. At this point, each candidate votes for itself and then requests votes from other candidates (a voter votes for the first requester they receive). If a candidate obtains more than half of the votes and reaches the quorum value, it becomes the leader (this leader is the leader of the Sentinel cluster and is responsible for the master-replica failover).
If the number of faulty Sentinels reaches half, the Sentinel cluster cannot perform a master-slave switch.
If the number of faulty Sentinels makes the available count less than the
quorumvalue, the master node cannot be judged as objectively down.
[So the number of Sentinels should be odd, and quorum = N/2 + 1.]
So how is a Sentinel cluster formed?
It can be formed using the command:
sentinel monitor <master-name> <ip> <redis-port> <quorum>. They discover each other through Redis’s “publisher/subscriber” mechanism.
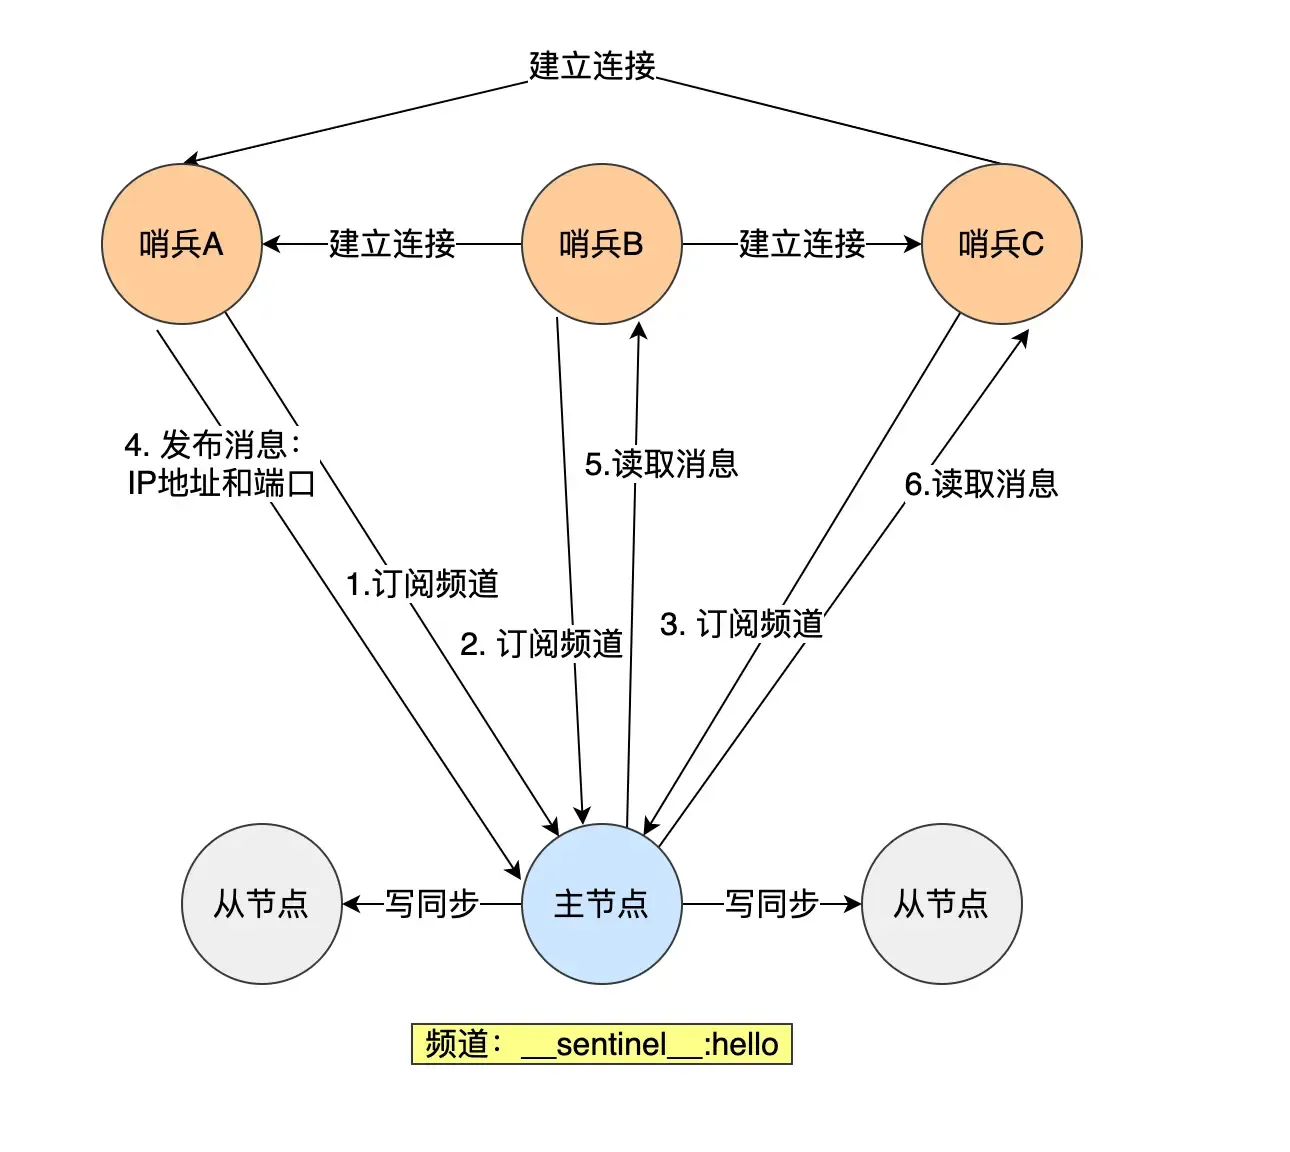
In a master-replica cluster, the master node has a channel named __sentinel__:hello. Sentinels can discover each other and communicate by subscribing to this channel.

A Sentinel publishes its IP and port to this channel, and other Sentinels subscribe to this channel. This Sentinel then establishes a network connection with other Sentinels (other Sentinels perform the same operation, so they can all connect with each other).
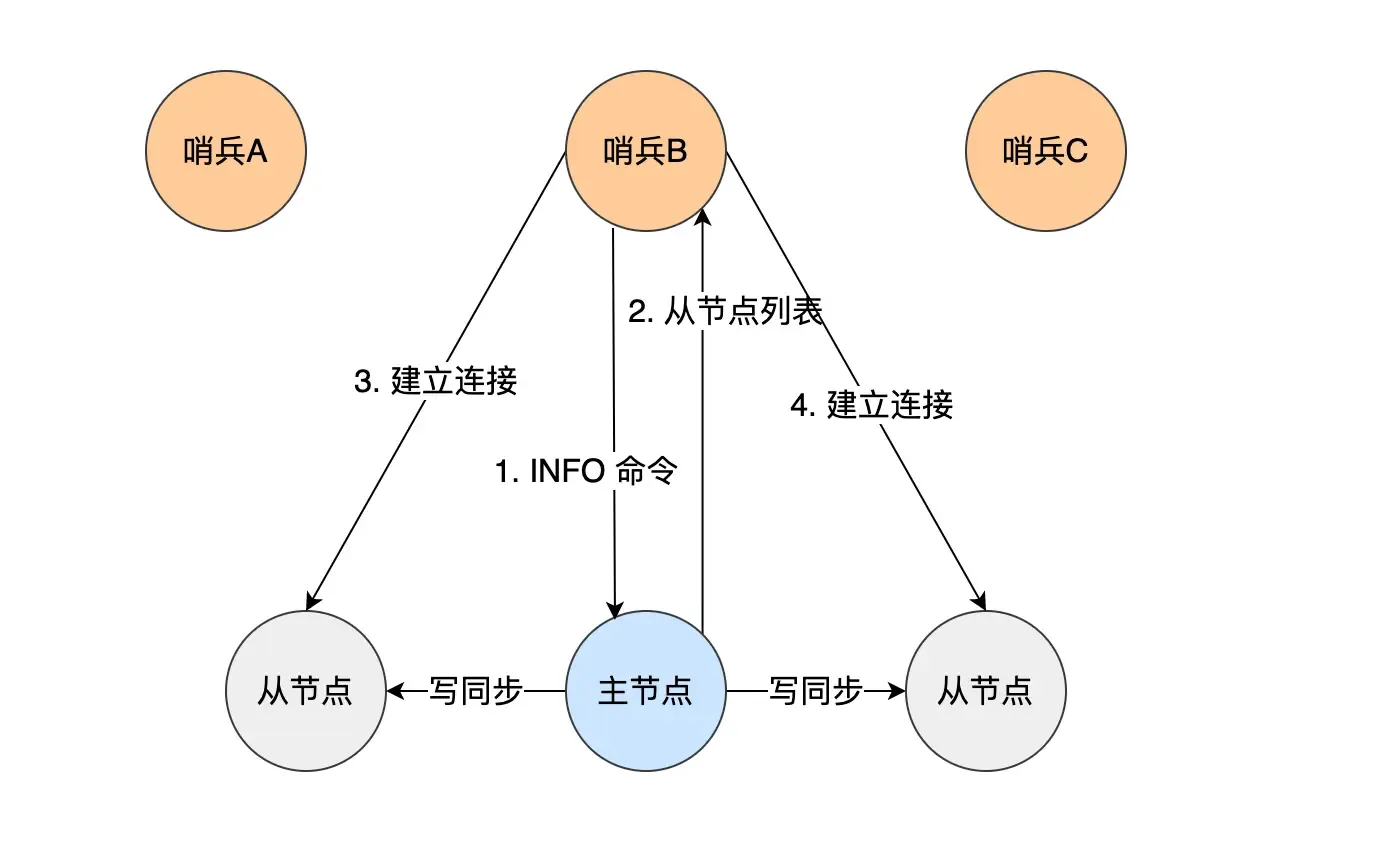
Then a new question arises: How does the Sentinel cluster monitor information about “replica nodes”?
The master node knows information about all replica nodes. Sentinels send an
INFOcommand every 10 seconds to get information about all replica nodes. The master returns a list of replicas to the Sentinel. The Sentinel can then establish a connection with each replica based on the information in the list for monitoring.
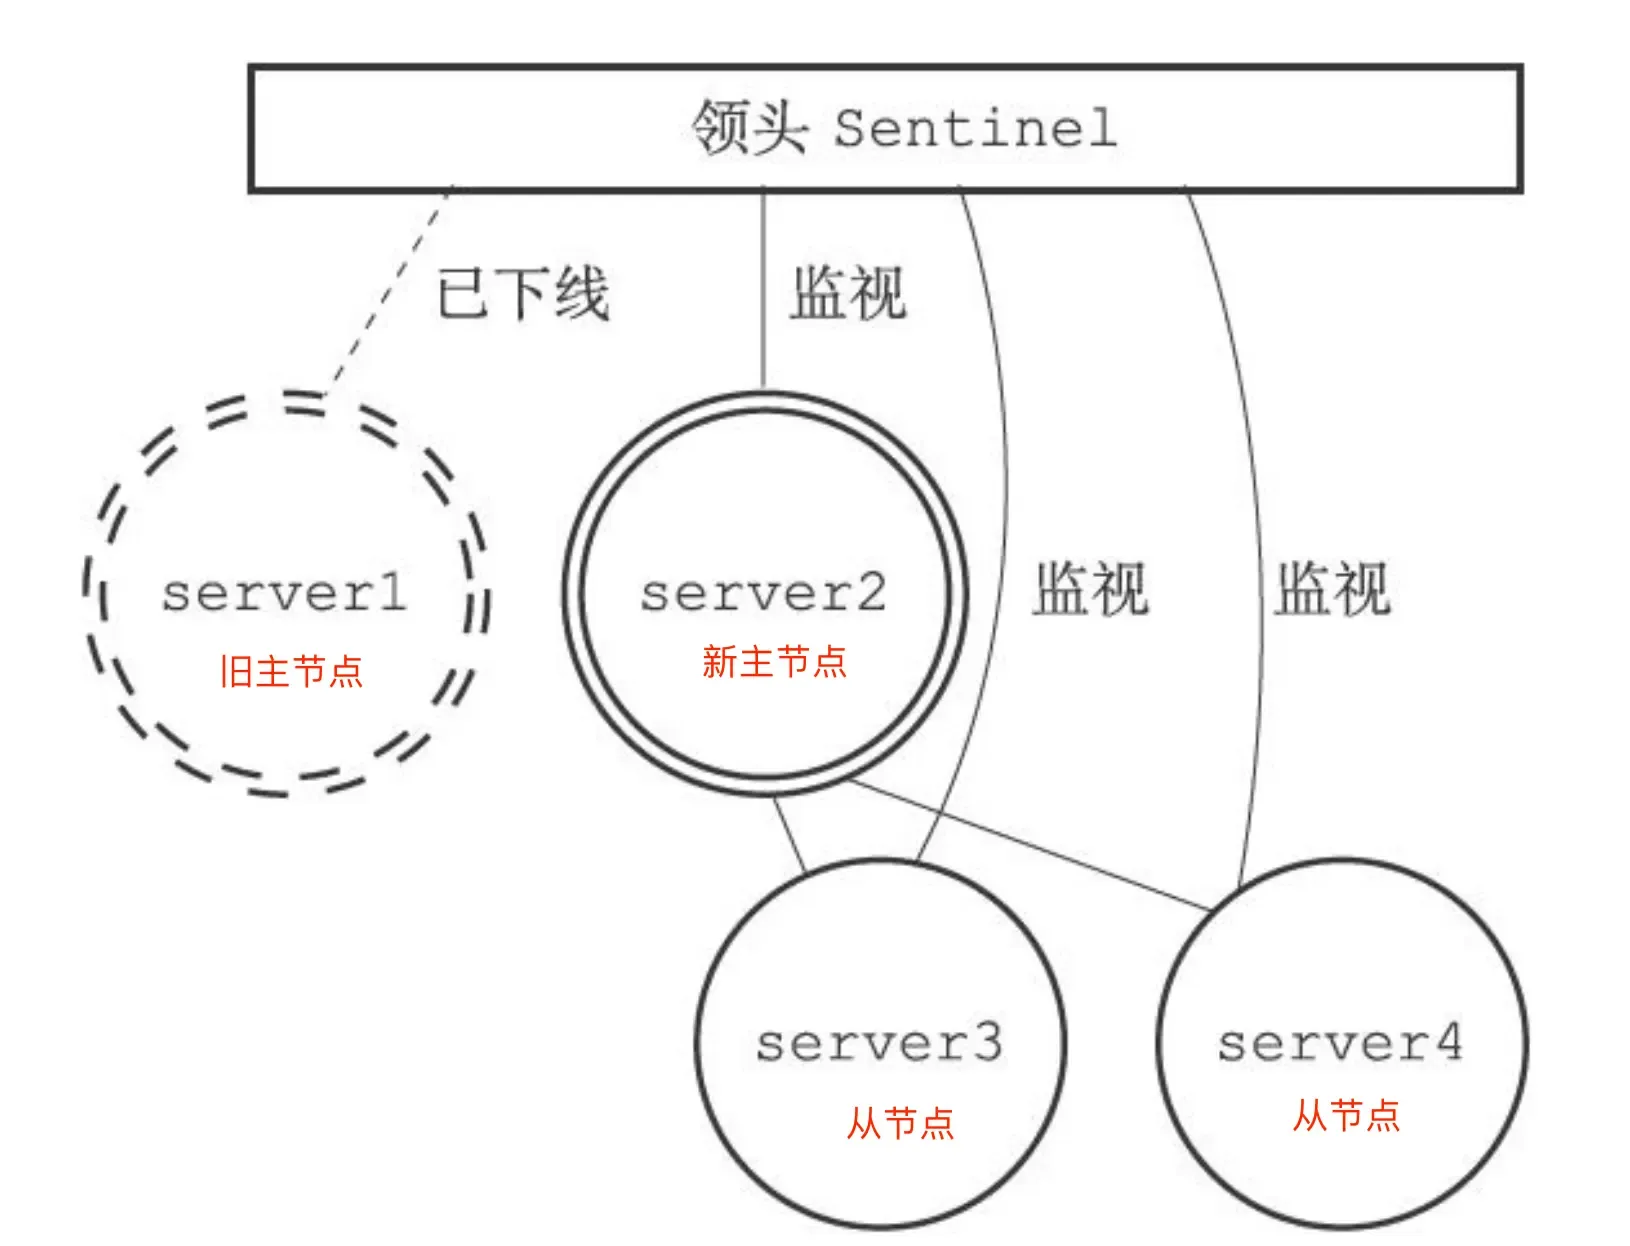
Specific process of master-replica failover:
- Select one replica from all the replicas belonging to the original master (now offline) to become the new master.
- Make these replicas change their replication target to the new master.
- Notify clients of the new master’s IP address and information through the “publisher/subscriber” mechanism.
- Continue monitoring the original master; if it comes back online, set it as a replica of the new master.
Q: The following steps are all performed by the Sentinel leader. Are the other replicas useless here?
One: Selecting the new master node
The task here is to select a replica that is “in good condition with complete data” from all replicas. The Sentinel leader then sends the SLAVEOF no one command to promote this node to the new master.
For safety, replicas that are offline or have a history of poor network connectivity need to be filtered out. (If a master-replica node times out (down-after-milliseconds) more than 10 times, it indicates poor network.)
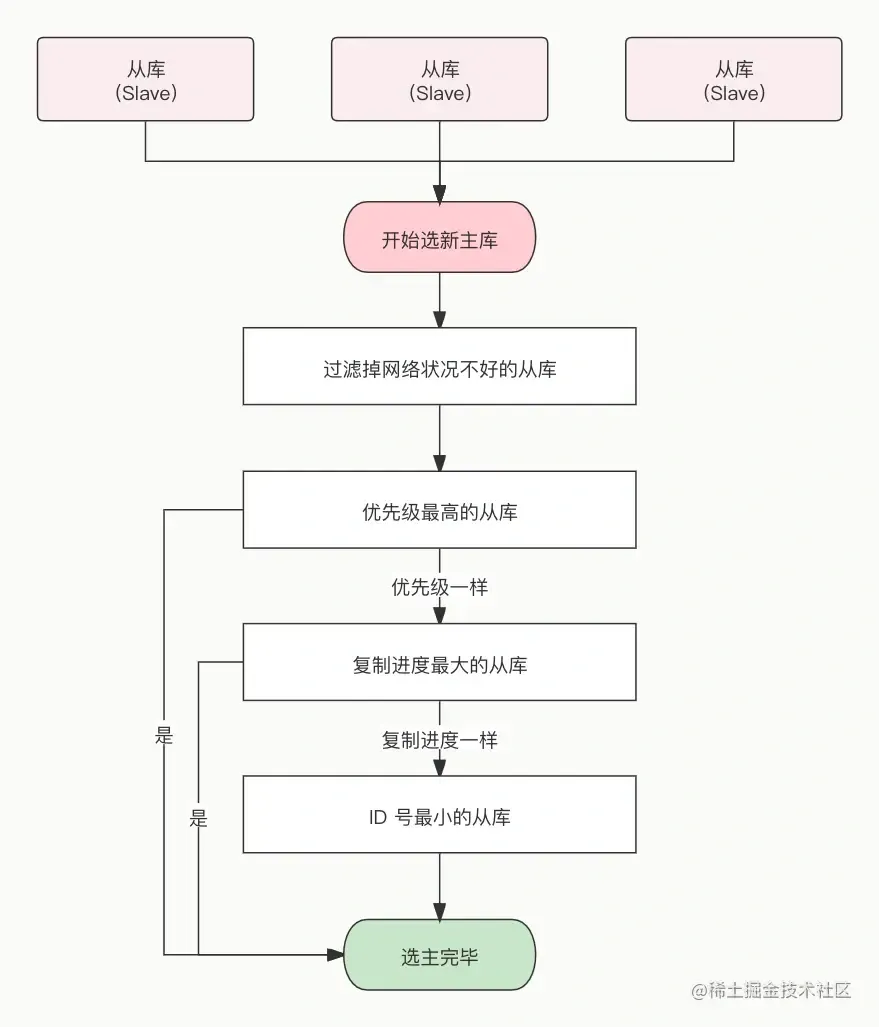
Then, the filtered replicas undergo three rounds of evaluation: priority, replication progress, and ID. The node that wins first in each round becomes the new master:
- The Sentinel sorts by replica priority; lower priority ranks higher.
- The replica’s priority is configured via
slave-priority(set based on each machine’s configuration).
- The replica’s priority is configured via
- If priorities are the same, the replication offset is checked. The replica that has received more replicated data ranks higher.
- How to evaluate “replication progress”? Look at which replica’s
slave_repl_offsetis closest to themaster_repl_offset; its progress is the most advanced.
- How to evaluate “replication progress”? Look at which replica’s
- If the first two are the same, the one with the smaller ID is chosen.
- What is the ID? A unique number for each replica node, identifying it.
This elects the new master. After the Sentinel leader sendsSLAVEOF no one, it sendsINFOcommands to the promoted replica at a frequency of once per second (if not in failover, it’s once every ten seconds). When the promoted replica’s role information changes fromslavetomaster, the Sentinel leader knows the upgrade to master was successful.
- What is the ID? A unique number for each replica node, identifying it.
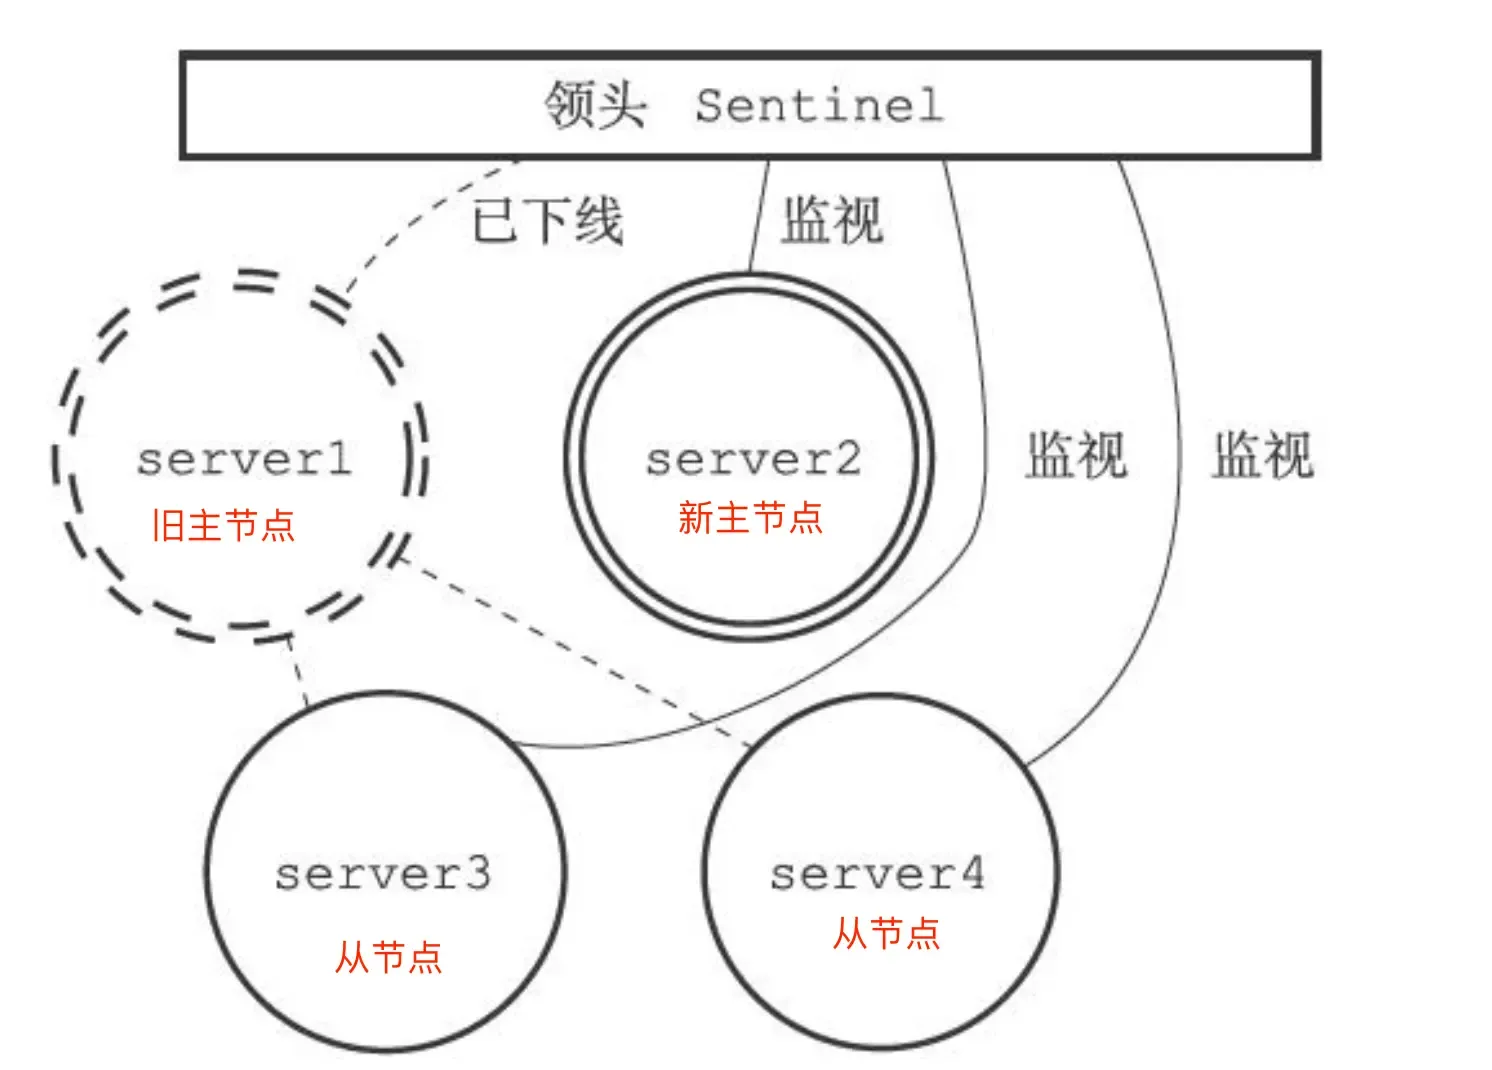
Current state:
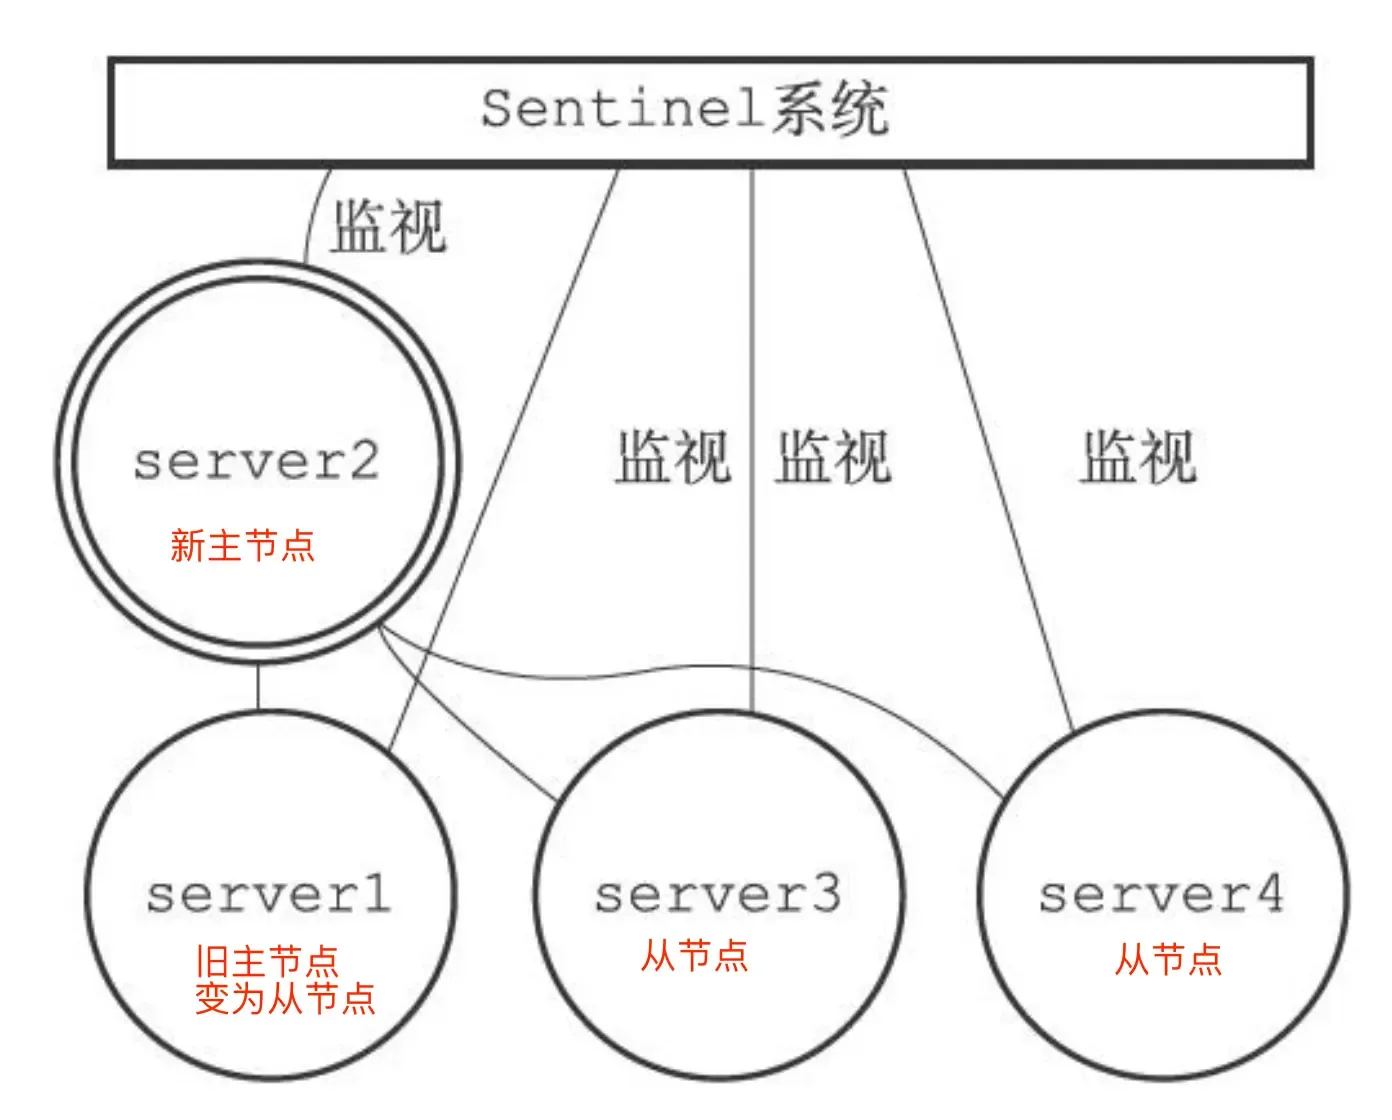
Two: Pointing replicas to the new master
The Sentinel leader sends SLAVEOF commands to all replicas, making them replicas of the new master:
Three: Notifying clients
Achieved through Redis’s “publisher/subscriber” mechanism. Each Sentinel provides this mechanism, and clients can subscribe to messages from Sentinels.
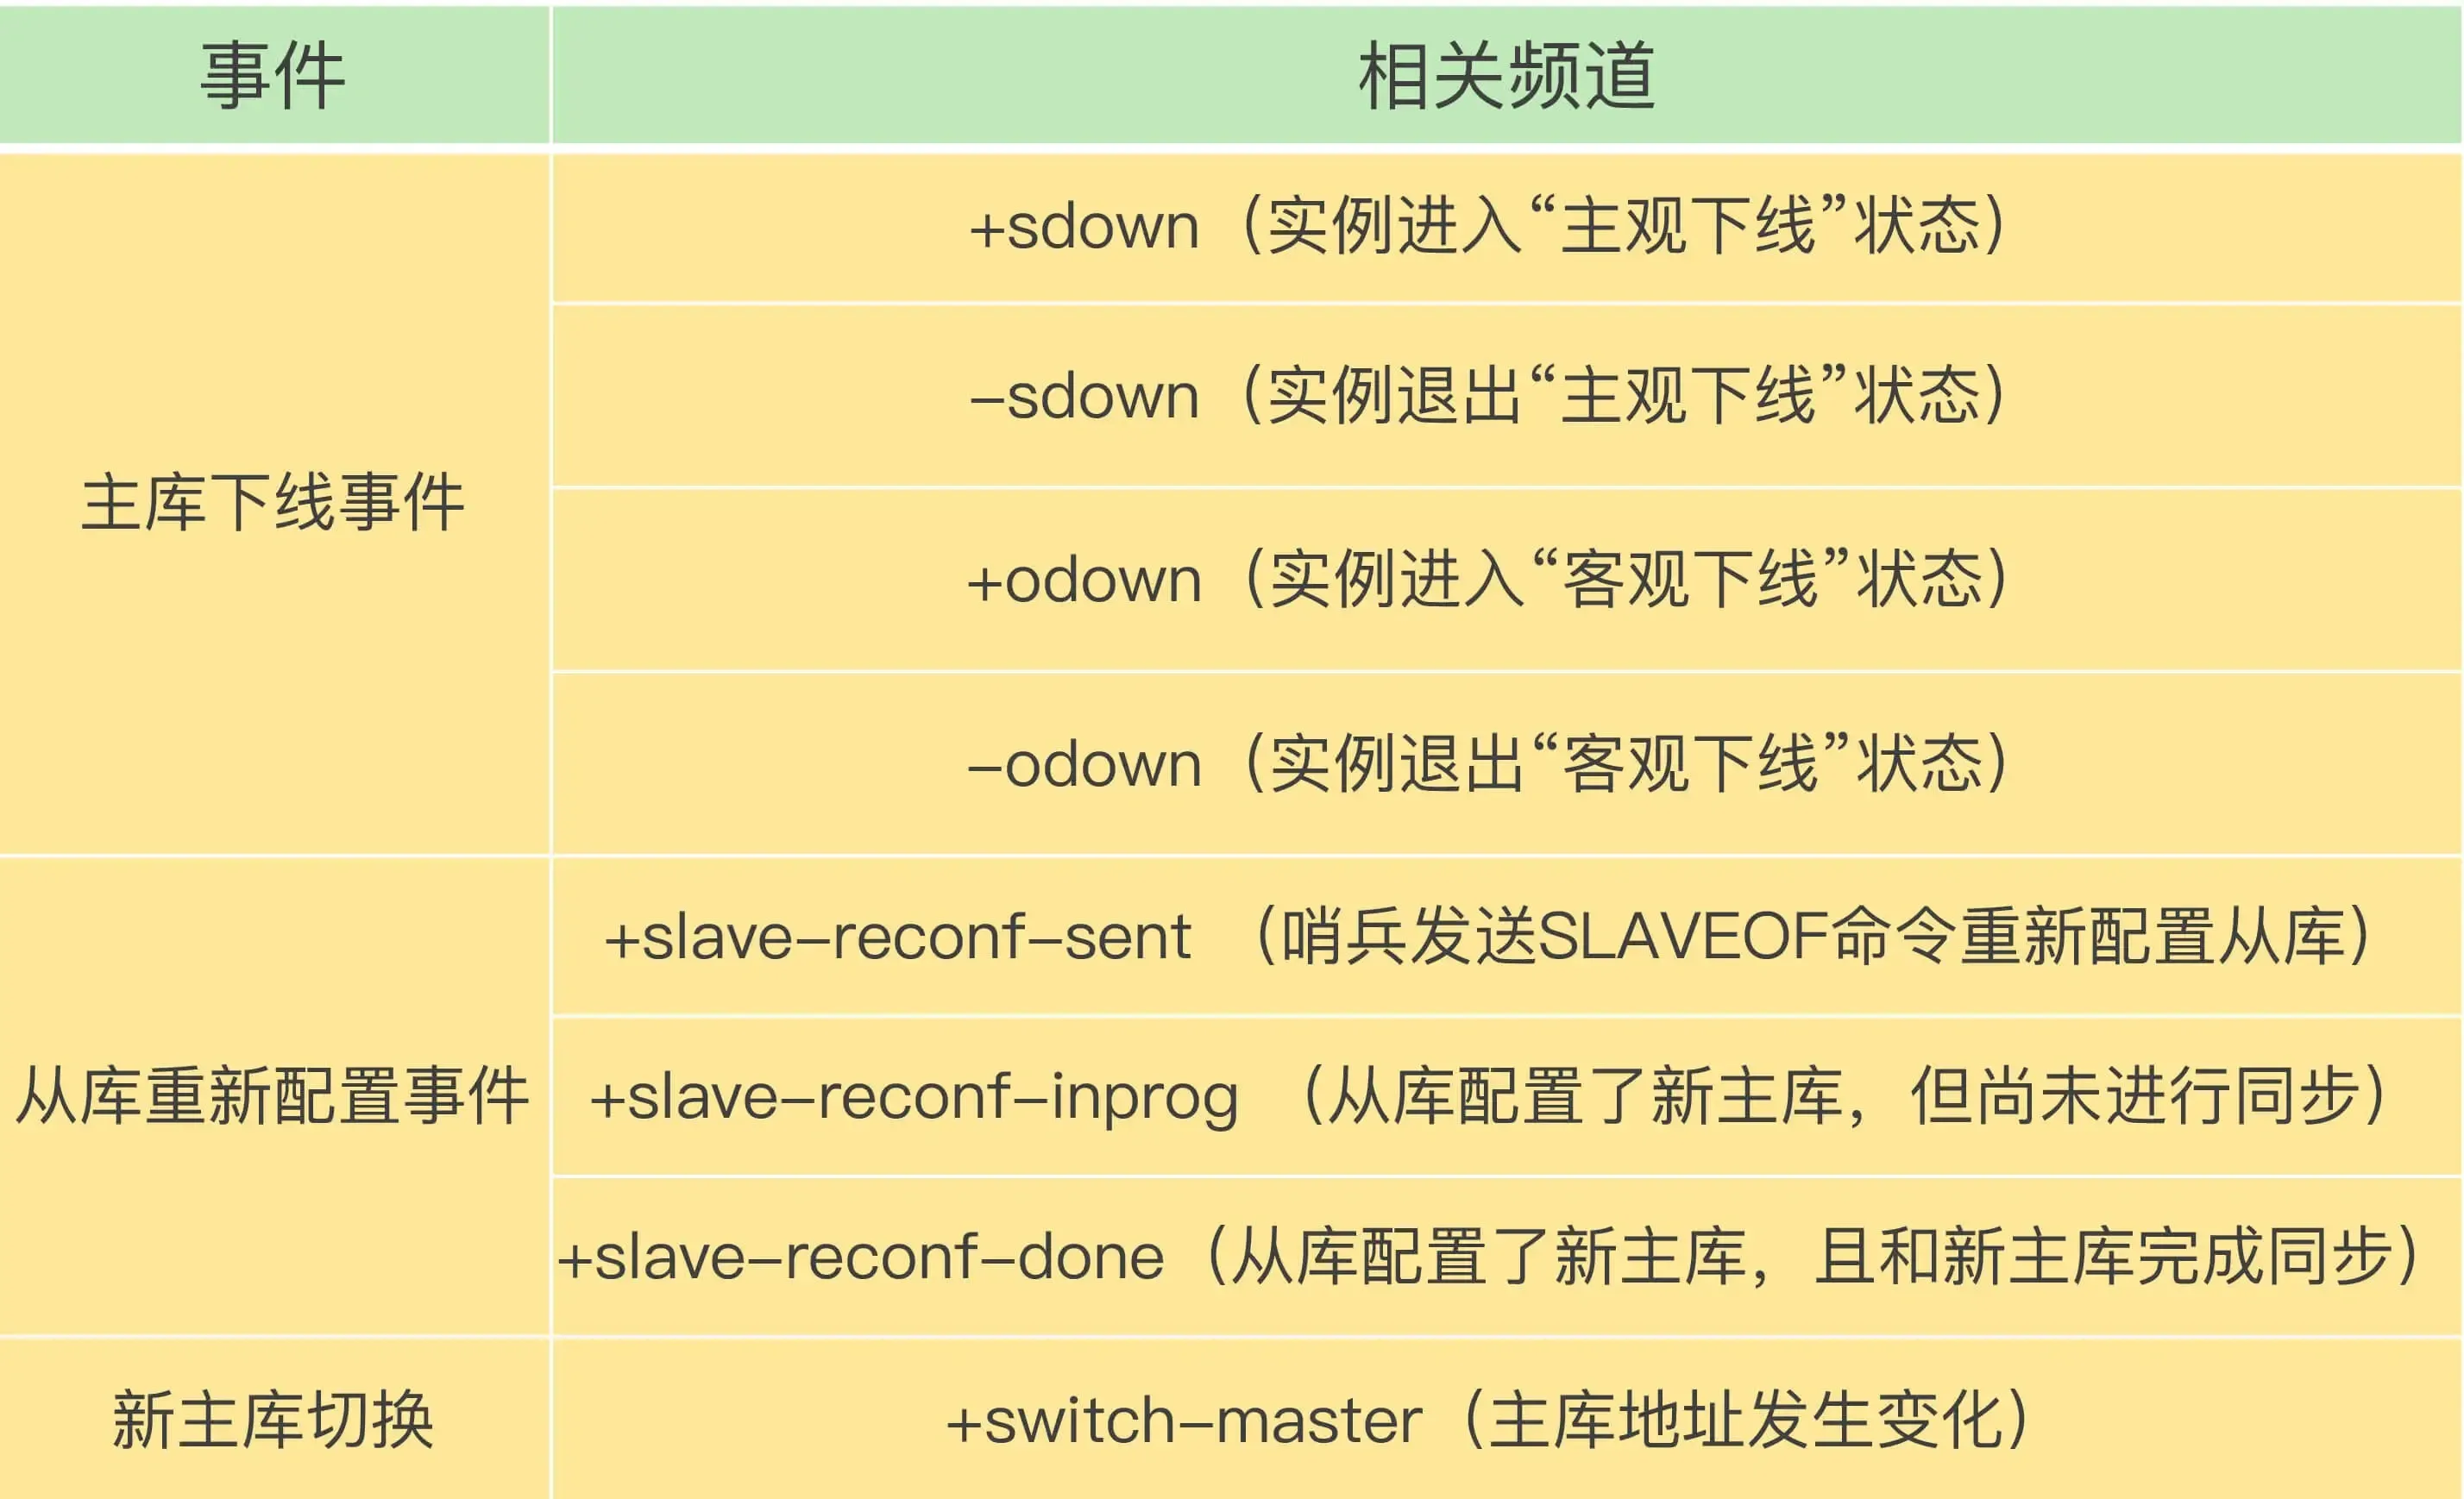
The Sentinel publishes the new master’s IP address and port information to the +switch-master channel. Clients can receive this information and then communicate using the new master’s IP and port.
(Furthermore, clients can obtain connection information for the new master after the master-slave switch and monitor various important events, which helps clients understand the progress of the “master-slave switch”.)
Four: Turning the original master into a replica
When the original master comes back online, set it as a replica of the new master:
Sharded Cluster Mode (Redis Cluster):
When the amount of cached data becomes too large, a cluster approach is needed to distribute data across different servers, reducing the system’s dependence on a single master node and improving read/write performance.
The Redis cluster uses a hash slot method to handle the mapping relationship between data and nodes.
A sharded cluster has 16384 (2^14) hash slots. Each key-value pair is mapped to a slot based on its key:
- Based on the key, a 16-bit value is calculated using the “CRC16” algorithm.
- The modulus is obtained by taking the 16-bit value % 16384.
How are these hash slots mapped to specific Redis nodes?
- Equal distribution: Hash slots are evenly distributed among nodes: i.e., each node gets
16384 / Nslots. - Manual assignment: Use the
cluster meetcommand to manually establish connections between nodes to form a cluster, then use thecluster addslotscommand to specify the number of hash slots for each node. (Manual assignment must allocate all slots, otherwise the cluster cannot operate normally.)
What to do if cluster brain-split leads to data loss?#
What is brain-split?
It occurs when the master node completely loses connection with its replicas. At this time, users, unaware of the Redis problem, continue sending write data as usual. The Sentinel, finding the master node disconnected, assumes the master is down (though it’s not down, just network issues). The Sentinel then elects a new master (resulting in two master nodes) — “brain-split”.
When the network recovers, the old master is demoted to a replica. The replica then requests data synchronization from the new master (clearing its own data and performing full synchronization). At this point, the data previously written to this replica is completely lost, i.e., the data loss problem caused by cluster brain-split.
When the master node finds that the total number of replicas that are communication timeout/offline exceeds a threshold, it prohibits the master node from writing data and directly returns an error to the client.
This can be controlled via parameters:
min-slaves-to-write x: The master must have at least x connected replicas, otherwise writes are prohibited.
Min-slaves-max-lag x: The replication and synchronization delay between master and replica cannot exceed x seconds, otherwise writes are prohibited.
Redis Expiration Deletion and Memory Eviction Policies#
Expiration Deletion Policy#
Expiration Deletion: Redis can set an expiration time for keys, so a corresponding mechanism is needed to delete expired key-value pairs.
How to set an expiration time?
expire <key> <n> Sets the key to expire after n seconds.
pexpire Sets the key to expire after n milliseconds.
expireat Sets the key to expire at a specific timestamp (in seconds).
pexpireat Sets the key to expire at a specific timestamp (in milliseconds).
When setting a string, the expiration time can also be set directly:
set <key> <value> ex <n> : Sets the key-value pair and specifies the expiration time (in seconds);
set <key> <value> px <n> : Sets the key-value pair and specifies the expiration time (in milliseconds);
setex <key> <n> <valule> : Sets the key-value pair and specifies the expiration time (in seconds).
To check the TTL of a key, use the
TTL keycommand. To cancel a key’s expiration time, use thepersist keycommand (TTL will then show -1).
How to determine if a key has expired?
When an expiration time is set for a key, Redis stores the key along with its expiration time in the “expires dictionary” (which holds the expiration times of all keys).
The expires dictionary is stored in redisDB:
typedef struct redisDb {
    dict *dict;    /* Database key space, holds all key-value pairs */
    dict *expires; /* Key expiration times */
    ....
} redisDb;
- The key in the expires dictionary is a pointer pointing to the key object.
- The value in the expires dictionary is a
long longtype integer, storing the key’s expiration time.
![Image](../../interview-redis-3/Attachments/F7C5